xState & Vue - creating an add to cart form component
In terms of designing UI interactions, xState is the best thing since sliced bread. It is absolutely imperative to make this library part of your frontend development toolkit.
Here I have a vue component, a form, that can be used to add one or more items to a shopping cart.
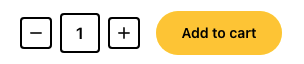
You can increase or decrease the quantity using the plus and minus buttons, you can write the quantity directly in the input field, and of course, you can add the item to the cart - this shows a confirmation message (Product(s) were added) for a brief second and then goes back to showing the initial “Add to cart” label.
Also, if I alter the validation rules to make the validation fail, pressing the add to cart button will display the errors under the form. Then if I send a valid quantity and press “Add to cart,” the errors will clear, and the items will be added to the cart.
Anyway, were going to create two components, one using xState and another one using a more traditional approach.
xState
Create a state machine using the createMachine() function. Every machine should have an id, a context (data you’re working with), an initial state, and a list with all the available states and events that allows the machine to transition from one state to another.
1<script setup> 2import PlusIcon from "./PlusIcon"; 3import MinusIcon from "./MinusIcon"; 4import {createMachine} from "xstate"; 5 6const props = defineProps({ 7 productId: Number, 8 qty: { 9 type: Number,10 default: 1,11 }12});13 14const addToCartMachine = createMachine({15 id: "addToCartMachine",16 context: {17 productId: props.productId,18 qty: props.qty,19 errors: {}20 },21 initial: "idle",22 states: {23 idle: {},24 adding: {},25 recentlyAdded: {},26 }27});28</script>idle is our initial state; meaning that the machine isn’t doing anything. adding is when we are in the process of adding the item(s) to the cart, and recentlyAdded is a short-lived state when we display the confirmation message saying the product(s) were added to the cart.
Next up, we need to define the events possible in each state.
When the machine is in the idle state, we should be able to update the quantity and add the item to the cart. So we’ll have:
1<script setup> 2import PlusIcon from "./PlusIcon"; 3import MinusIcon from "./MinusIcon"; 4import {createMachine} from "xstate"; 5 6const props = defineProps({ 7 productId: Number, 8 qty: { 9 type: Number,10 default: 1,11 }12});13 14const addToCartMachine = createMachine({15 id: "addToCartMachine",16 context: {17 productId: props.productId,18 qty: props.qty,19 errors: {}20 },21 initial: "idle",22 states: {23 idle: {24 on: {25 UPDATE_QTY: {}, 26 ADD_TO_CART: {}27 }28 },29 adding: {},30 recentlyAdded: {},31 }32});33</script>An event is used to cause side effects using actions (e.g., update context data, say the quantity) and then transition to a different (or the same) state (defined by the target key).
An event can also be subjected to conditions - meaning that the transition won’t happen unless the event passes the applied conditions. In our example, we need a minQty guard to prevent the transition if the provided quantity is lower than 1 - it doesn’t make sense to add 0 or negative amounts to a shopping cart.
1<script setup> 2import PlusIcon from "./PlusIcon"; 3import MinusIcon from "./MinusIcon"; 4import {createMachine} from "xstate"; 5 6const props = defineProps({ 7 productId: Number, 8 qty: { 9 type: Number,10 default: 1,11 }12});13 14const addToCartMachine = createMachine({15 id: "addToCartMachine",16 context: {17 productId: props.productId,18 qty: props.qty,19 errors: {}20 },21 initial: "idle",22 states: {23 idle: {24 on: {25 UPDATE_QTY: {26 actions: "assignQty", 27 cond: "minQty",28 target: "idle"29 },30 ADD_TO_CART: {31 target: "adding" 32 }33 }34 },35 adding: {},36 recentlyAdded: {},37 }38});39</script>Moving on to the adding state, we’ll need to invoke a service here. Think of services as other machines/processes that take a while to complete. In our example, we’ll have a promise - the axios request made to add the item(s) to the cart.
Since the request might fail, either because of generic server errors, or validation errors, we’ll need to assign those errors to our context to display them in the component template. However, we should also clear those errors the next time we enter the adding state, so we’ll define an entry action using the entry key.
1<script setup> 2import PlusIcon from "./PlusIcon"; 3import MinusIcon from "./MinusIcon"; 4import {createMachine} from "xstate"; 5 6const props = defineProps({ 7 productId: Number, 8 qty: { 9 type: Number,10 default: 1,11 }12});13 14const addToCartMachine = createMachine({15 id: "addToCartMachine",16 context: {17 productId: props.productId,18 qty: props.qty,19 errors: {}20 },21 initial: "idle",22 states: {23 idle: {24 on: {25 UPDATE_QTY: {26 actions: "assignQty",27 cond: "minQty",28 target: "idle"29 },30 ADD_TO_CART: {31 target: "adding"32 }33 }34 },35 adding: {36 entry: "clearErrors", 37 invoke: {38 id: "addToCart",39 src: "addToCart",40 onDone: {41 target: "recentlyAdded"42 },43 onError: {44 actions: "assignErrors",45 target: "idle"46 }47 }48 },49 recentlyAdded: {},50 }51});52</script>Finally, the recentlyAdded state should be short-lived - after 1000, it should transition back to the idle state. At the same time, updating the quantity should be allowed.
1<script setup> 2import PlusIcon from "./PlusIcon"; 3import MinusIcon from "./MinusIcon"; 4import {createMachine} from "xstate"; 5 6const props = defineProps({ 7 productId: Number, 8 qty: { 9 type: Number,10 default: 1,11 }12});13 14const addToCartMachine = createMachine({15 id: "addToCartMachine",16 context: {17 productId: props.productId,18 qty: props.qty,19 errors: {}20 },21 initial: "idle",22 states: {23 idle: {24 on: {25 UPDATE_QTY: {26 actions: "assignQty",27 cond: "minQty",28 target: "idle"29 },30 ADD_TO_CART: {31 target: "adding"32 }33 }34 },35 adding: {36 entry: "clearErrors"37 invoke: {38 id: "addToCart",39 src: "addToCart",40 onDone: {41 target: "recentlyAdded"42 },43 onError: {44 actions: "assignErrors",45 target: "idle"46 }47 }48 },49 recentlyAdded: {50 after: { 51 1000: {52 target: "idle"53 }54 },55 on: {56 UPDATE_QTY: {57 actions: "assignQty",58 cond: "minQty",59 target: "recentlyAdded"60 },61 }62 },63 }64});65</script>And that’s it with defining the logic of our machine. Our next step is implementing the actions, guards, and services we’ve referenced in the machine definition. We’ll pass a second parameter to the createMachine function to do that.
1<script setup> 2import PlusIcon from "./PlusIcon"; 3import MinusIcon from "./MinusIcon"; 4import {assign, createMachine} from "xstate"; 5 6const props = defineProps({ 7 productId: Number, 8 qty: { 9 type: Number,10 default: 1,11 }12});13 14const addToCartMachine = createMachine({15 id: "addToCartMachine",16 context: {17 productId: props.productId,18 qty: props.qty,19 errors: {}20 },21 initial: "idle",22 states: {23 idle: {24 on: {25 UPDATE_QTY: {26 actions: "assignQty",27 cond: "minQty",28 target: "idle"29 },30 ADD_TO_CART: {31 target: "adding"32 }33 }34 },35 adding: {36 entry: "clearErrors",37 invoke: {38 id: "addToCart",39 src: "addToCart",40 onDone: {41 target: "recentlyAdded"42 },43 onError: {44 actions: "assignErrors",45 target: "idle"46 }47 }48 },49 recentlyAdded: {50 after: {51 1000: {52 target: "idle"53 }54 },55 on: {56 UPDATE_QTY: {57 actions: "assignQty",58 cond: "minQty",59 target: "recentlyAdded"60 },61 }62 },63 }64}, { 65 actions: {66 assignQty: assign({67 qty: (ctx, event) => event.value68 }),69 clearErrors: assign({70 errors: {}71 }),72 assignErrors: assign({73 errors: (ctx, {data: {response: {data: {errors = {}}, status = 500}}}) => {74 let result = {};75 76 if (status === 422) {77 for (let key in errors) {78 result[key] = errors[key][0];79 }80 } else {81 result.unknown = "Something went wrong. Please try again later."82 }83 84 return result;85 }86 }),87 },88 services: {89 addToCart: (ctx) => axios.post('/api/cart-items', {qty: ctx.qty, productId: ctx.productId})90 },91 guards: {92 minQty: (ctx, event) => event.value >= 193 },94});95</script>The assign() function is used to update the machine context - it receives an object whose values can be direct values or callbacks that receive the current context and event as parameters and return the desired value for that key.
Moving on, xstate/vue comes with a useMachine() composable. This will give us access to a state value that represents the machine's current state, a send function we can use to send events to our machine, and a service that represents the current interpretation of the machine.
Here’s how we can use all these inside our template:
1<template> 2 <form @submit.prevent="send('ADD_TO_CART')"> 3 <div class="flex space-x-4"> 4 <div class="flex items-center space-x-2"> 5 <button 6 class="p-1 rounded border-2 border-black hover:bg-yellow-400 focus:outline-none focus-visible:border-yellow-400" 7 type="button" 8 @click="send({type: 'UPDATE_QTY', value: state.context.qty - 1})"> 9 <MinusIcon class="h-5 w-5"/>10 </button>11 12 <input13 :value="state.context.qty"14 class="p-1 w-10 h-10 font-semibold text-center rounded border-2 border-black outline-none focus:ring-transparent focus:border-yellow-400"15 type="number"16 @change="(ev) => send({type: 'UPDATE_QTY', value: parseInt(ev.target.value, 10)})">17 18 <button19 class="p-1 rounded border-2 border-black hover:bg-yellow-400 focus:outline-none focus-visible:border-yellow-400"20 type="button"21 @click="send({type: 'UPDATE_QTY', value: state.context.qty + 1})">22 <PlusIcon class="w-5 h-5"/>23 </button>24 </div>25 26 <button27 class="inline-flex justify-center items-center px-6 py-2.5 text-sm font-semibold text-black bg-yellow-400 rounded-full border-2 border-transparent hover:bg-black hover:text-white focus:outline-none focus-visible:border-black">28 {{29 state.matches('recentlyAdded') ? (state.context.qty > 1 ? 'Products were added' : 'Product was added') : 'Add to cart'30 }}31 </button>32 </div>33 34 <div v-if="state.context.errors.productId" class="mt-2 text-sm text-red-600">{{state.context.errors.productId }}</div>35 <div v-if="state.context.errors.qty" class="mt-2 text-sm text-red-600">{{ state.context.errors.qty }}</div>36 <div v-if="state.context.errors.unknown" class="mt-2 text-sm text-red-600">{{ state.context.errors.unknown }}</div>37 </form>38</template>Traditional approach
Here’s the same thing using a more traditional approach. I won’t even bother commenting on it since most people are already used to this coding style.
1<script setup> 2import PlusIcon from "./PlusIcon"; 3import MinusIcon from "./MinusIcon"; 4import {ref} from "vue"; 5 6const props = defineProps({ 7 productId: Number, 8 qty: { 9 type: Number,10 default: 1,11 }12});13 14const qty = ref(props.qty);15const errors = ref({});16const isSubmitting = ref(false);17const isRecentlyAdded = ref(false);18 19async function onSubmit() {20 errors.value = {};21 if (isSubmitting.value || isRecentlyAdded.value) return;22 23 try {24 isSubmitting.value = true;25 await axios.post('/api/cart-items', {qty: qty.value, productId: props.productId});26 isRecentlyAdded.value = true;27 setTimeout(() => isRecentlyAdded.value = false, 1000);28 } catch ({response: {data: {errors: err = {}}, status = 500}}) {29 if (status === 422) {30 for (let key in err) {31 errors.value[key] = err[key][0];32 }33 } else {34 errors.value.unknown = "Something went wrong. Please try again later."35 }36 }37 38 isSubmitting.value = false;39}40</script>41 42<template>43 <form @submit.prevent="onSubmit()">44 <div class="flex space-x-4">45 <div class="flex items-center space-x-2">46 <button47 class="p-1 rounded border-2 border-black hover:bg-yellow-400 focus:outline-none focus-visible:border-yellow-400"48 type="button"49 @click="qty-1 > 0 ? qty-- :qty">50 <MinusIcon class="h-5 w-5"/>51 </button>52 53 <input54 v-model="qty"55 class="p-1 w-10 h-10 font-semibold text-center rounded border-2 border-black outline-none focus:ring-transparent focus:border-yellow-400"56 type="number">57 58 <button59 class="p-1 rounded border-2 border-black hover:bg-yellow-400 focus:outline-none focus-visible:border-yellow-400"60 type="button"61 @click="qty++">62 <PlusIcon class="w-5 h-5"/>63 </button>64 </div>65 66 <button67 class="inline-flex justify-center items-center px-6 py-2.5 text-sm font-semibold text-black bg-yellow-400 rounded-full border-2 border-transparent hover:bg-black hover:text-white focus:outline-none focus-visible:border-black">68 {{ isRecentlyAdded ? (qty > 1 ? 'Products were added' : 'Product was added') : 'Add to cart' }}69 </button>70 </div>71 72 <div v-if="errors.productId" class="mt-2 text-sm text-red-600">73 {{ errors.productId }}74 </div>75 <div v-if="errors.qty" class="mt-2 text-sm text-red-600">76 {{ errors.qty }}77 </div>78 <div v-if="errors.unknown" class="mt-2 text-sm text-red-600">79 {{ errors.unknown }}80 </div>81 </form>82</template>If we briefly compare the xState version with the traditional version, we can quickly go, “hey, the second one is shorter and more familiar.. soo.. it must be better”.
However, even though the second version is shorter, it is much harder to follow and significantly harder to create in the first place; because you’re constantly bouncing back from “what should happen” and “what shouldn’t happen.” The component logic and implementation details are all mingled together into a big spaghetti ball of code - and because of that, the second version is much more error-prone than the first one; just think about how many times you had to break the execution of a function or disable a button because “the user shouldn’t be able to do this when this happens.”
Once you get used to doing things in a certain way, it becomes pretty hard to give up and try something new - especially if that something new looks like more work - which is often how people perceive xState to be like.
And that has some truth in it - xState does look like more work. But that’s only on the surface. In reality, it makes designing UI interactions a billion times easier, cleaner, and most importantly, less error-prone.
With xState, you’re encouraged to focus on the component flow first, work out the implementation later, and worry about what should happen - because what shouldn’t happen is ignored by default.
Trust me. Give xState a chance - it will be a bit awkward at first, but you will grow to love it.